Posted on

How to Make a Medicine Bag

medicine bag kit

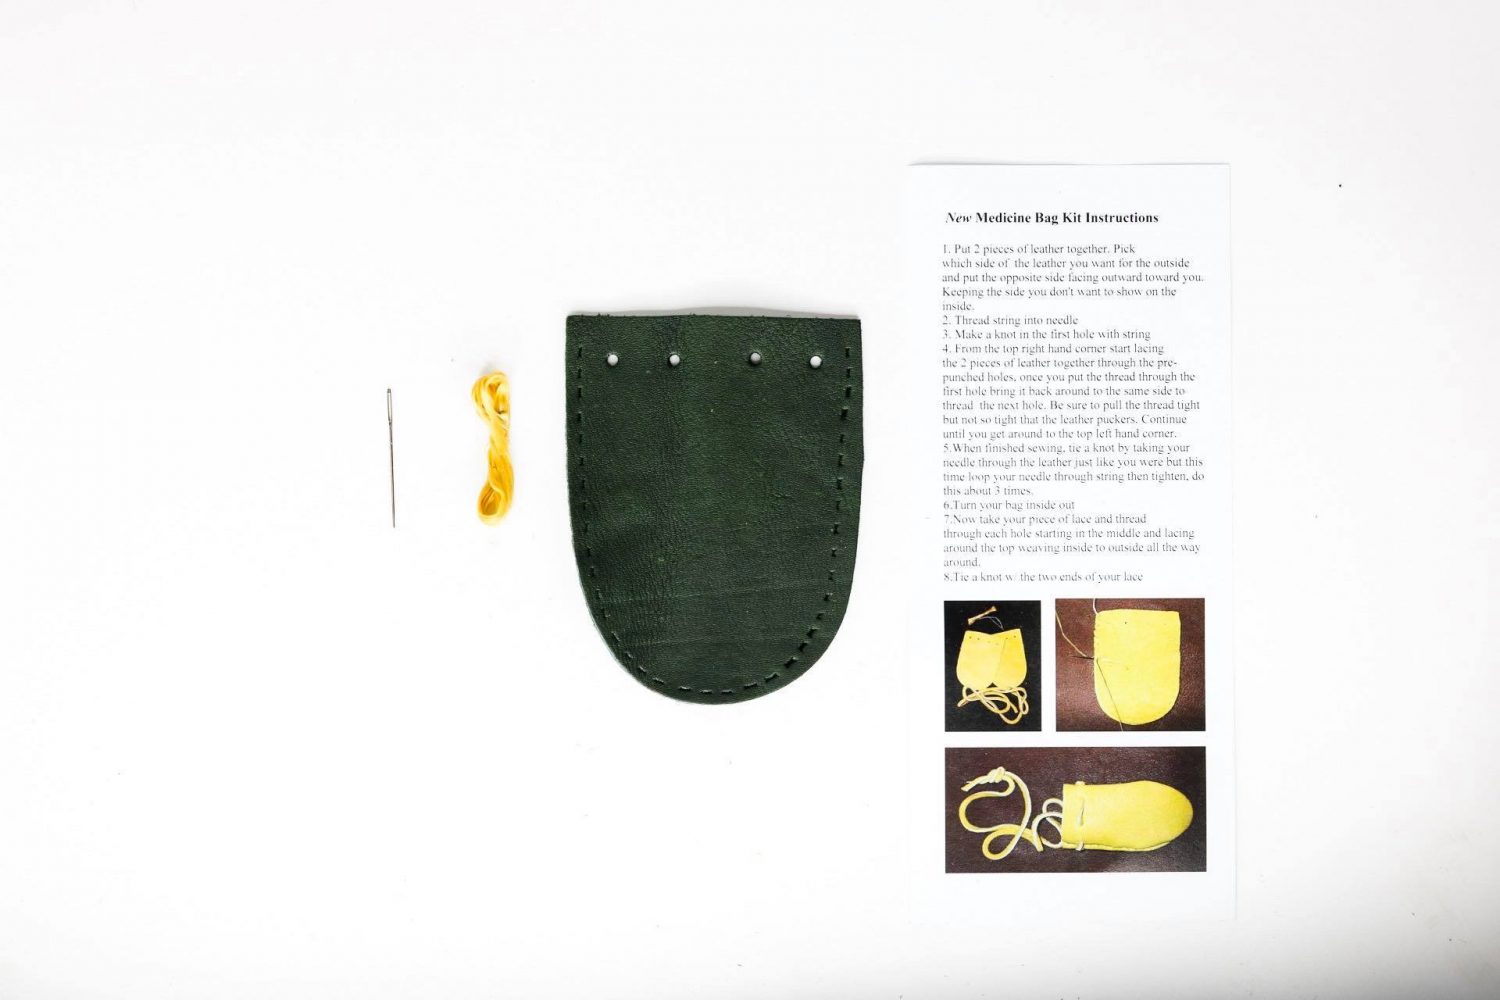
Create a meaningful keepsake with your kit from Centralia Fur & Hide

Why make a medicine bag?

A medicine bag is more than just a pouch—it’s a sacred and personal container for items of spiritual significance, healing, memory, or protection. At Centralia Fur & Hide, our medicine bags and kits combine traditional materials with modern accessibility so you can craft your own meaningful piece.
By purchasing one of our medicine bag kits, you get the leather, ties, and essentials ready; all you need is your intention and a little crafting. Our products are made from deer, bison, and elk leather (including brain-tanned deer leather and turtle shell accents) to give your finished bag durability and authenticity. Centralia Fur & Hide

What you’ll need

When you choose one of our kits (or a ready-made medicine bag) you’ll receive high-quality materials. Here’s the general list of what you’ll need to make your medicine bag:

  • Leather pouch (deer, bison or elk) provided in the kit
  • Leather tie or lace to close the bag
  • Optional accents such as turtle shell, beads, fringe, etc. (depending on kit)
  • Your special items: herbs, talismans, stones, feathers—whatever you wish to carry
  • A quiet space and clear intention for what your medicine bag represents

Step-by-step: How to make your medicine bag

  1. Prepare your space and intention. Before you begin, take a moment to reflect on what this bag will hold or represent. Quiet your mind, gather your items, and set aside dedicated time.
  2. Inspect your leather pouch or kit. Lay out the leather pouch (or kit pieces) you purchased from Centralia Fur & Hide. Confirm that the tie or lace is included and that the leather is clean and ready.
  3. Select your contents. Choose the items you’ll place inside: herbs, stones, small keepsakes, or talismans. These should hold personal meaning.
  4. Place your items thoughtfully. Into the pouch, place the items with intention. Some people choose to wrap delicate pieces in cloth or secure small items in a mini bag inside.
  5. Close the bag. Pull the leather tie or lace to close the pouch securely. You may choose to knot the tie or let it hang freely depending on your style.
  6. Add optional decorative touches. If your kit includes fringe, beads, or a turtle shell accent (as some of our kits do), attach them now for a custom finish. This not only adds aesthetic character but further personalizes the piece.
  7. Bless or dedicate your medicine bag. Many makers of medicine bags take a moment to pray, speak a dedication, or leave the pouch in moonlight or sunlight for a short period. This step is optional but deepens the meaning.
  8. Wear or carry your bag. Once completed, you can wear your medicine bag around your neck, tuck it into a sacred space, or keep it close in another meaningful way.

Tips for choosing your kit from Centralia Fur & Hide

  • Match your material to your purpose. A brain-tanned deer leather pouch offers a soft, natural finish for lighter loads or delicate items. Bison leather is more heavy duty and great for more rugged use.
  • Consider the size. Our listings include 2×4″ “mini” sizes and larger 4×6″ pouches. Choose a size that fits what you intend to carry.
  • Choose style accents that reflect you. If you want a natural look, go for plain leather. For more personalized flair, pick a kit with beads, fringe, or turtle shell.
  • Shipping & domestic rules. Our site notes that all products can be shipped internationally and that certain wildlife shipping rules apply.

Why buying from Centralia Fur & Hide is a great choice

  • Our medicine bags are crafted from quality materials such as deer, bison and elk leather—giving you a piece built to last. Centralia Fur & Hide
  • We provide ready-to-make kits and finished bags, offering flexibility whether you want DIY or convenience.
  • We specialize in Native American-style craft supplies and support makers and crafters with authentic products.
  • Shopping with us means you’re working with a business that puts hand-selection and craftsmanship first, so your medicine bag means more than just “a pouch”.

Optimize Your Medicine Bag Experience

  • Once your medicine bag is complete, store it in a sacred place, or wear it close so it can serve its purpose of keeping what’s important near your heart.
  • If you choose to refill or refresh your bag later—just open, clean gently, and place new items. The leather will age gracefully and tell your story.
  • Consider pairing your medicine bag with other supplies from Centralia Fur & Hide—like deer lace, sinuew, or leather strips—to expand your craft and create matching pieces.

Shop Medicine Bags Now

Posted on

How to Use a Smudge Kit: A Guide to Cleansing and Positive Energy

Smudging is a sacred practice rooted in Native American traditions, used to cleanse spaces, objects, and even the mind and body of negative energy. Whether you’re new to smudging or looking to deepen your understanding, this guide will walk you through how to use a smudge kit effectively and respectfully.

What Is a Smudge Kit?

A smudge kit typically includes:

  • Smudge Sticks: Bundles of dried herbs like sage, cedar, or sweetgrass.
  • Abalone Shell: Used to catch ash and symbolize the water element.
  • Feather: Helps fan the smoke and represent the air element.
  • Matches or a Lighter: To ignite the smudge stick.

Each component has spiritual significance, creating a harmonious balance of earth, air, fire, and water elements during your smudging ritual.


When Should You Use a Smudge Kit?

Smudging is often performed to:

  • Cleanse a new home or space.
  • Prepare for meditation or prayer.
  • Remove negative energy after a conflict or stressful event.
  • Bless new objects or gifts.
  • Create a peaceful environment.

Step-by-Step Guide to Smudging

  1. Prepare Your Space
    • Ensure proper ventilation by opening a window or door. This allows negative energy to leave the space.
  2. Set Your Intention
    • Before lighting the smudge stick, focus on what you want to achieve. For example, you might want to invite positive energy, cleanse negativity, or offer gratitude.
  3. Light the Smudge Stick
    • Hold the smudge stick at a 45-degree angle and light the tip. Allow it to burn for a few seconds before gently blowing out the flame, leaving the embers to smolder and produce smoke.
  4. Direct the Smoke
    • Using your feather, gently fan the smoke in the direction of your intention. Move clockwise around the space or object you wish to cleanse.
    • For personal cleansing, direct the smoke around your body, starting at your feet and moving upward.
  5. Focus on Key Areas
    • Pay extra attention to doorways, windows, and corners, as these areas often accumulate stagnant energy.
  6. Extinguish the Smudge Stick
    • Once finished, extinguish the stick by pressing it into sand, a fireproof bowl, or the abalone shell. Ensure it is fully extinguished to avoid accidental fires.

Respectful Smudging Practices

Smudging is a deeply spiritual practice with cultural roots in Native American traditions. Keep the following in mind:

  • Approach smudging with respect and gratitude.
  • Source your smudge kit from ethical sellers who honor the traditions and communities from which these practices originate.
  • Be mindful of overharvesting concerns, particularly with white sage. Consider alternatives like garden sage, rosemary, or lavender.

Elevate Your Smudging Ritual

At Centralia Fur & Hide, we offer authentic smudge kits crafted with care and respect for Native American traditions. Explore our collection to find the tools you need to bring harmony and positivity into your life.

Posted on

How to Punch Holes in Leather: A Step-by-Step Guide for Native American Hand Drums

Creating a Native American hand drum is an art that requires precision, patience, and a deep understanding of the materials. One of the steps in drum-making is punching holes in the leather, which are essential for lacing and securing the drumhead. In this guide, we’ll walk you through the process of punching holes in leather, ensuring your hand drum is crafted with care and accuracy.

Here are the Steps

 2. Gathering the Necessary Tools

To punch holes in leather, you’ll need the following tools:

– Leather Punch: A rotary punch with adjustable hole sizes is ideal. It allows for precise control over the size of the holes (for leather).

– Awl: An awl can be used for marking and starting the holes lacing (for rawhide).

– Cutting Mat: A sturdy surface to protect your workspace and ensure clean cuts.

– Ruler and Marking Tool: For measuring and marking the placement.

 3. Marking the Locations

Using a ruler and a marking tool, measure and mark the spots where you want to punch the holes. For most Native American hand drums, holes are often spaced evenly around the perimeter. The spacing and number of holes can vary based on the drum’s size and design. Marking the placements accurately ensures a balanced and secure drumhead.

 4. Punching the Holes

Position the leather punch over the marked spot and apply steady pressure to create the hole. If you’re using a rotary punch, select the appropriate hole size.

 5. Finishing Touches

Once all the punches are complete, you can start lacing the drumhead. Ensure the lacing is tight and even to achieve the best sound quality and appearance.

 Conclusion

Punching holes in leather is a crucial skill in the art of crafting Native American hand drums. By following these steps and using the right tools, you can create beautifully crafted drums that honor tradition and craftsmanship. Whether you’re a seasoned drum maker or a beginner, mastering this technique will enhance your creations and connect you to a rich cultural heritage.

For more tips and supplies on drum-making, visit Fur & Hide, your trusted source for high-quality leather and tools. Good luck!